Demonstrates the use of the Kuesa API to import a glTF2 file and extract assets from it.
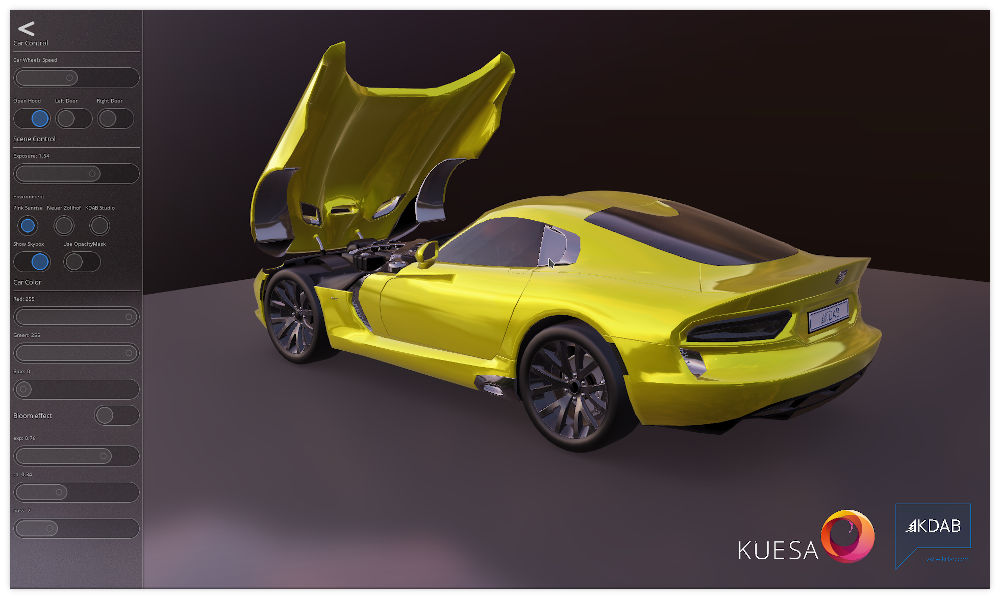
The car-scene example relies on the regular QtQuick and Qt 3D APIs to instantiate a QtQuick based application that combines Qt 3D based content with a 2D UI overlay.
 Item {
     id: mainRoot

     // 3D Content

     Material.theme: Material.Dark
     Material.accent: Material.Blue

     Item {
         id: baseUI
         anchors.fill: parent

         Wind {
             id: wind
             anchors.fill: parent
             visible: menu.useOpacityMask
         }

         Scene3D {
             id: scene3D
             anchors.fill: parent
             focus: true
             multisample: true
             aspects: ["input", "animation", "logic"]

             // Root Scene Entity
             MainScene {
                 id: sceneContent
         ...
Kuesa provides the SceneEntity element which holds collections of Qt 3D assets accessible by name.
 import Kuesa 1.2 as Kuesa
 import Kuesa.Effects 1.2 as Effects

 Kuesa.SceneEntity {
     id: scene
In order to load a glTF2 file, Kuesa provides the GLTF2Importer element. If the sceneEntity property is set to a valid SceneEntity instance, Qt 3D assets generated while parsing the file will be automatically added to the various asset collections.
     // Loads GLTF 2.0 asset
     Kuesa.GLTF2Importer {
         sceneEntity: scene
         source: "qrc:/DodgeViper" + _modelSuffix + ".gltf"
     }
Usually, you will want to interact with some elements of your scene. The Asset element allows to retrieve an asset by name. If the asset for a given name really exist in the specified collection, the node property allows you to access the underlying asset instance.
You can use the Kuesa Studio gltfInspector to introspect a glTF2 scene files and find the names of the various assets it contains.
For instance you might want to select a Camera by name.
     Kuesa.Asset {
         id: sweepCam
         collection: scene.cameras
         name: "SweepCam"
     }
Once retrieved, you can create binding on some of the Camera properties.
     QQ2.Binding {
         target: sweepCam.node
         property: "aspectRatio"
         value: mainCamera.aspectRatio
     }
Similarly you could retrieve a Material asset
     // We create a baseColorFactor property. If the property exists in the node, it will be a proxy of the node property
     // When we set the qml property, the node property will be updated accordingly
     // When the node property is updated in C++, the qml property will be updated
     // As soon as the node is changed, the qml property is updated if it has a C++ equivalent
     Kuesa.Asset {
         property color baseColorFactor: scene.carBaseColorFactor
         id: carMaterial
         collection: scene.materials
         name: "Mat_CarPaint"
         onBaseColorFactorChanged: console.log("Binding 1 works. Color: " + baseColorFactor)
         onNodeChanged: scene.carBaseColorFactor = carMaterial.baseColorFactor
     }
And create a binding on its properties to control the appearance of elements in the scene that use that material.
     property var baseColorFactorProp: carMaterial.baseColorFactor
     onBaseColorFactorPropChanged: console.log("Binding 2 works. Color: " + baseColorFactorProp)
The AnimationPlayer allows to control the playback of animation clips that can be retrieve by name.
     Kuesa.AnimationPlayer {
         id: hoodAnimator
         sceneEntity: scene
         clock: Clock { }
         clip: "HoodAction"
     }

     Kuesa.AnimationPlayer {
         id: leftDoorAnimator
         sceneEntity: scene
         clock: Clock { }
         clip: "DoorLAction"
     }

     Kuesa.AnimationPlayer {
         id: rightDoorAnimator
         sceneEntity: scene
         clock: Clock { }
         clip: "DoorRAction"
     }
First you need to instantiate the effects you want to use.
     Effects.OpacityMask {
         id: opacityMaskEffect
         mask: TextureLoader {
             source: "qrc:/opacity_mask.png";
             generateMipMaps: false
         }
         premultipliedAlpha: true // This is what Scene3D/QtQuick expects
     }

     Effects.BloomEffect {
         id: bloomFx
         threshold: 0.34
         blurPassCount: 2
     }
Once you have created the effects, they need to be added to the ForwardRenderer FrameGraph. The order in which they are added dictates the order in which they are applied.
         RenderSettings {
             // FrameGraph
             activeFrameGraph: Kuesa.ForwardRenderer {
                 id: frameGraph
                 camera: scene.animated && sweepCam.node ? sweepCam.node : mainCamera
                 postProcessingEffects: {
                     var effects = []
                     if (useBloomEffect)
                         effects.push(bloomFx)
                     if (useOpacityMask)
                         effects.push(opacityMaskEffect)
                     return effects
                 }
                 skinning: showSkybox
                 backToFrontSorting: true
                 toneMappingAlgorithm: Effects.ToneMappingAndGammaCorrectionEffect.Reinhard
 //                showDebugOverlay: true
             }
         },
Files:
Images: